
|
One of the skills that distinguishes experienced yoga teachers from newer instructors is the ability to create sequences that are intentional, safe, empowering and effective. While there are many approaches to sequencing, I almost always use a method known as Peak Pose Sequencing because it provides a clear framework for organizing a class while preparing students progressively and logically for more complex postures.
Peak Pose Sequencing begins with a clear objective and develops the class around the physical requirements of a single posture. This approach helps create classes that are logical, engaging, and biomechanically sound.
Peak Pose Sequencing is a method of class design that begins by selecting one posture to serve as the focal point of the practice. This posture, often referred to as the peak pose, typically requires several different physical skills or movement patterns to perform safely and effectively. These poses are complex (think: several moving pieces) not just hard (think of a pose like chair, which is challenging, but not particularly complicated). The ability to do a peak pose effectively not simply about a practitioner’s strength; the brain’s ability to “juggle several” balls at the same time while being oriented in space is part of what makes the posture difficult.
Examples of peak poses might include:
One of the advantages of this sequencing method is that it can be adapted to many teaching styles. While a hatha class may move through the sequence slowly with an emphasis on alignment, stability and accessibility, a vinyasa class will include more surya namaskar, flowing transition, and linked postures.Although the pacing and transitions will differ, the underlying logic of the sequence remains the same.
After selecting a peak pose, you must identify its component parts.
A component part is a part of the body that must be warmed up or educated in order to do the peak pose effectively. Your list of component parts should focus on 5-6 areas of the body. (It would be accurate to say, “everything in the body is involved in this posture!” so we are distilling a list to look the actions and openings that are most relevant to our target pose.)
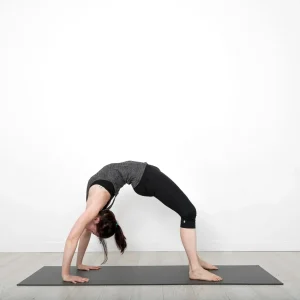
Example: wheel pose
Don’t skip this step! Once you’ve identified your component parts, it can be tempting to jump straight into sequence creation. However, you will create a better sequence if you first pause and create a list of relevant postures for each listed component part.
For example, if one component part of wheel is maintaining neutral hip alignment, appropriate preparatory poses might include Mountain Pose, Chair Pose, Warrior I, High Lunge, Warrior III, Pyramid Pose, and Revolved Chair. Each of these encourages students to maintain balanced alignment through the pelvis in a relatively neutral (as opposed to external) position.
Similarly, if thoracic extension is an important requirement, preparatory postures might include Sphinx Pose, Locust Pose, Cobra Pose, Camel Pose, Bridge Pose, or Standing Backbends. Each posture helps students develop spinal extension in more accessible positions.
Repeat this process for each component part.
As you create your list, you’ll see that the same poses may pop up on for several component parts (for example, a high lunge with supports neutral hip alignment, hip flexor lengthening, thoracic extension, shoulder flexion and external rotation. , encouraging shoulder flexion, and introducing thoracic extension. You can keep these postures in mind for giving you a lot of “bang for your buck.”
After brainstorming supporting postures, you will organize them into a complete class based on your class style.
In general, you want to organize your postures from most accessible to most complex. Early in your sequence, you want to practice simpler postures that set the stage for putting more complex poses together later. Teach the component parts first in isolation to develop literacy, then combine them in more challenging postures once a solid foundation has been set. sequencing progresses from simpler movements toward increasingly complex ones. Earlier postures often introduce individual component parts in isolation, while later postures begin combining several movement patterns together. The postures immediately preceding the peak pose should closely resemble its overall demands.
While a hatha sequence will be more accessible (easier transitions, less surya namaskar, no vinyasa, longer holds) a vinyasa class will use the vinyasa as a “scaffold” upon which to build the sequence. A vinyasa class may link several postures together and repeat series of poses. While a vinyasa class could involve more challenging postures than the hatha class, the real difference between these two styles is found in the transitions and pacing.
Sequencing does not end with the peak pose. The integration – the last 25% of your class – should mindfully counterpose the body from the peak postures. In your integration, consider which tissues have been strengthened, which have been lengthened, and select counterposes that will help restore balance. For example, if your peak pose is Warrior III (which is a big hamstring opener) then yo udon’t want to do a bunch of hamstring openers in your integration.
Following an intensive backbend practice, for example, it would be appropriate to include twists, forward folds, and adductor stretches. You want to build your integration with as much care as the “active” portion of your sequences. In other words, I wouldn’t jump from Wheel into Paschimottasana (which is its complete opposite); create an integration sequence that works towards a fuller counterpose.
One of the greatest strengths of Peak Pose Sequencing is that it provides you with a consistent framework for class planning without limiting your creativity. In fact, the structure of Peak Pose Sequencing helps create boundaries that can support your creativity to flourish – without sacrificing safety and functionality.
Like any teaching skill, your sequencing will become more intuitive with practice. Be patient and have fun!

Rachel supports yoga teachers and studios around the world to create transformational education experiences that help them thrive in their business, share their passion, and inspire more people to practice yoga. Her extensive knowledge and experience include: earning two masters degrees, authoring three books, leading 4,000+ hours of TT, building a teacher training college for a national yoga company, and working behind the scenes in yoga studio & teacher management for more than fifteen years. As a writer and speaker, she continually wrestles with the juicy bits of life: relationships, authenticity, and discovering meaning in this crazy, wildish world. E-RYT 500, YACEP, BA, MFA, MSci. Learn more about Rachel.

Leave a Reply